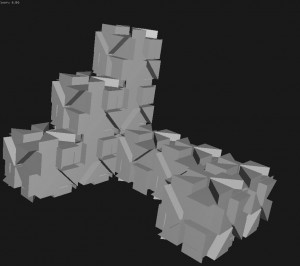
3D to 2D correspondence Mapping Technique

I’ve been testing out a technique using a modified version of Kyle McDonald’s opensource Mapamok code to quickly calibrate a virtual 3d model to a projector and I’m finding it’s a good technique for mapping models. I’ve developed a workflow so you can use mapamok for mapping and then use TouchDesigner for rendering. Here are some notes on the process:
UPDATE:
I put up the TouchDesigner 077 file I used for this and the binary of the mapamok with modified output up on github
1. construct a virtual model of the object you want to map. This is probably the most time consuming process but since the calculated projection matrix will attempt to stretch, scale and shear your model into the projector’s viewpoint you do get a little tolerance in regards to your model not exactly matching real world measurements.
virtual model made by modeling one face of the object using photographs and then duplicating
2. Open up modified Mapamok program with your virtual model converted to fbx format. Select a feature point on the virtual model
3. Press space bar to switch to projector view. It is assumed that you are duplicating the same display on your monitor and on your projector. Move the cursor to the same feature on the real model from the projector’s view
4. Repeat this process for at least 5 points. After five points the program will attempt to calculate the best fitting transformation and projection for your virtual model and render it to the screen.
5. Add more points as needed to refine the fit. Since the program only figures out a rotation, translation and perspective skew, adding more points will only improve the fit to a certain extent. Going back and moving around the points can also help improve the match.
6. Once you have a good fit select save Calibration. An xml file will be generated with openCV’s best guess for the transformation and projection matrix values to match your virtual model to the projected view.
7. If you have more than one projector you must repeat this process for each projector. Save a copy of the first projector’s xml output and then switch the first projector’s display cable with the second one and reopen mapamok.
8. Open the touchdesigner template and import the same fbx model that you used in mapamok. press the button to load the xml file data into touch. This will apply the transformation matrix to your imported geometry. It will also apply the projection matrix to your touch designer camera. Now your Touch Designer render should match the output generated by Mapamok.
9. Now that you’ve saved out the configuration files for the two projectors you can switch your desktop to extended view and load up a comp for each projector swapping out the xml files with the one generated for that projector.
10. Now you can apply your touch designer TOPS, CHOPS and MATS as you would in any project.
Here is a video of a test using two projectors. Matching the features to get the xml output should take no longer than 10 to 20 minutes.
I think this is a promising technique. I’m not sure how well it will work on really complex models but it might still be useful to get a rough mapping that can then be nudged and tweaked. For simple models I think it will work really well and could possibly be automated with some sort of tracker marking.


hey, I’m really intrested on exporting the camera position and stuff from Mapamok on to any 3D software. Is it a special build of Mapamok that let’s you export that data in .xml format because mine just exports 3 .yml files when I save calibration and I can’t get that data to work on any 3D software. Also, can you explain how you connected the xml data to the object and camera in touchDesigner ?? is it a project that we can download somewhere ? Thnx in advance
I modified the build of Mapamok to export the data in a more friendly format. The yml data has the numbers in scientific notation which has to be converted. I have not made the project available to download but the folks at Derivative have made their own version of the process which you can download from http://www.derivative.ca/Forum/viewtopic.php?f=22&t=4225
Yeah,,, but that requires version TD .088 🙁
Basicaly that’s exactly what I am having problems with: converting the yml data (rotation vectors and matrixes)to something more convinent for Autodesk Maya camera attributes or any other 3D software 🙂
Thnx a lot for your reply !
I put up a copy of the modified Mapamok binary and a touchdesigner 077 version example up on github